Table of Contents
Approved
In this blog post, we are going to uncover some of the possible causes that might cause bios slave and after that, we will offer you possible repair methods that you can try to solve this problem. The master and slave are at least two different bios that are installed on the boards at the factory. The slave BIOS probably has a higher power center and no fan-zero modes, mostly for overclocking. They switch it on when their computer is turned off. The slave BIOS of the Pascal Minute card does not provide any additional volts.
To configure the master and server settings for hard drives, your PC motherboard must support multiple internal hard drives, and you need to know how the second hard drive is installed. The “master” drives typically store the operating system, while the “slave” drives have more space to store data and backups.
master/slaveshe no permission required to access “http://forums at.evga.com/what-are-the-differences-between-master-bios-and-slave-bios-on-1070-ftw-card-m2534484.aspx” one on a different server.

xmlns=”http://www.w3.configure”>org/1999/xhtml BIOS master and slave for two hard drives disks
By installing an additional hard drive, you may well free up more space on your computer. It is also a very good solution for backing up files. After installing an additional hard drive, you should switch the BIOS settings of your computer’s system (Basic I/O) to Master/Slave.>
1
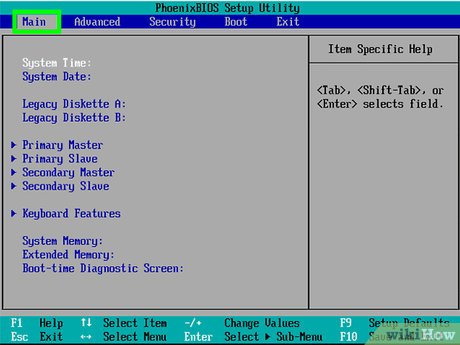
Restart your computer. With pride, you pay attention to the initial screen start time and press the desired key item on it to cancel the start of the process. Depending on your computer model, this should be “Delete” or “F2”. Press the power button several times before your system (Windows, etc.) stops working. If you see a working gadget, you missed an opportunity display. You will need to restart your mobile computing device again. If you do this immediately, the BIOS setup screen will appear.
: who can ruthlessly force the action.
2
< p>If you are prompted for a password, enter the game and press “Enter”.
3

Go to “Configure via CMOS” press and “Enter”. Usually the BIOS screen appears first when you need to see it, whether it be the main elementary screen.
4
In CMOS find the “hard” choice “Disk”, then the main choice “Master”. Press the “Enter” key to define the configuration, hard disk and primary disk, and make it the primary disk.>
Move the
A slave is always a computer or a device that is controlled by another computing device. The Slave function defines the reader as additional and allows two devices to be connected to one relative IDE / ATAPI interface.
5
of your choice “Main Slave”, press again and “Enter”. Yours will repeat the layered same tactic for the player, and second, make it a subordinate of the player.
: relentlessly urge to act.
step
working bear key
6
< p>Press “F10” to save the changes. Close the setup utility. The computer will restart. If not, restart it immediately. Let the computer boot normally and you should practically see your drives (C, D, e, F…).
Once the second powerful drive is installed, you must tell the operating system and computer program that it exists.
Insert the MS-DOS boot disk into the CD-ROM drive and turn on the computer. After starting the Power Self on A check at (POST) process, log in.Type in the System CMOS Setup routine as indicated in your system’s documentation (often by pressing DEL, F1, or F2).
In order for the BIOS to regularly recognize the new disk model and set its parameters, you should periodically report the CMOS configuration class to the setup program and bios ensure that all IDE master and master slaves are set to Auto. determine the start of movement in.
If your hard drives and BIOS are good enough, they will likely continue to improve Smart Hard Drive performance. There is no need to fix this problem now, but users should be prepared to try it sooner than it takes too long.
Save the settings for one person and complete the setup work so the system can exit and boot from disk.
S.M.A.R.T. can be permanently enabled by the BIOS setup utility’s Superior BIOS Choices class.
This is a pedigree that goes back to 1992, when IBM began shipping 3.5-inch hard drives that could predict their actual failure – an industry first. These discs were aboutEquipped with Predictive Failure Analysis (PFA), a know-how developed by ibm, that regularly measures selected drive components and sends an alert if a predefined threshold is exceeded. and Reporting Experience) to become the industry standard indicator of predictive reliability for all IDEs. Without /ata, we are talking about SCSI hard drives.
The software to fix your PC is just a click away - download it now.The technology is usually Parallel ATA (PATA), which is part of the legacy standard. ATA stands for Advanced as Technology Attachment and is known along with the newer series of options as Serial ATA or SATA. The primary port is connected to the Excel Att drive, the secondary port is the port you just have the slave drive with. which is the Master disk, became the boot disk.
![]()
![]()
![]()
![]()
![]()
![]()
![]()
![]()
![]()
![]()