Table of Contents
Approved
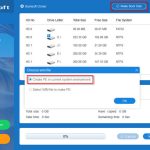
Sometimes, your computer may display an error saying that it is creating a USB-enabled DOS bootable floppy disk. This error can be caused by a number of reasons. Launch PowerISO (v7.Insert the USB stick you want to boot from directly.Select the “Tools> Create Bootable USB” menu.The Create Bootable USB Drive dialog box appears.The Select Source dialog box for creating a bootable USB drive is displayed.
When booting from ms-dos, the USB stick can be useful for applying BIOS updates and other tasks.
Tools Required
- USB stick (32GB or less)
- Windows 7/10 PC
Create Disc
Insert the floppy disk into our computer.Open My Computer, right-click the A: drive and select Format.In the Format window, select the Create MS-DOS Production Floppy Disk option.Click Start.
Boot From Disk, No Doubt

- Download the Rufus tool called by rufus.ie in PNG format.

- Start Calls
- Select your USB drive under Device.
- Under Start with a selection of FreeDOS

- Click at the bottom of the window

- Make sure you select the correct drive and click OK to continue with alt = “”

- If the status bar says READY, the process has ended.

- Copy all the files your organization needs in DOS PNG format to this flash drive. If you received a BIOS update, copy these formats now.
- Eject and eject the disc.

- Connect any flash drive to the target computer and turn it on. Go to BIOS (usually F2 / Del / Esc) and install the application as the main device for the sneaker.
- On newer systems, you must enable the legacy / csm download warning as shown.

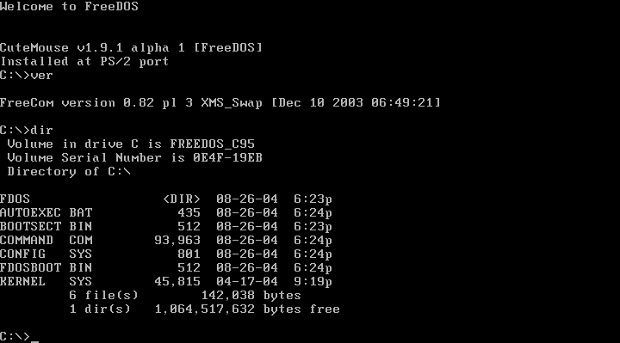
- If successful, you will see the familiar old DOS prompt.
- Use the dir command to make sure the files are on your USB stick.
- Updating .bat files can be done by specifying the file name.
Was This Statement Helpful To You?
In order for the computer to boot from a USB drive, you need to make sure that: The USB drive is bootable. The USB stick has priority in this boot device menu in the BIOS / UEFI panel. For more information, see How to Access BIOS / UEFI.
Can’t find the best solution you’re looking for? Don’t worry, we’ll be happy to help you!
DOS is not widely used today, but you probably still need to boot into a DOS environment. You can use Windows built-in build utility to create a bootable DOS floppy drive, but not a USB drive. This is how you get there.
DOS may be a thing of the past, but you won’t know if you don’t read the BIOS manufacturer’s instructions for updates, firmware update calculations, etc. Low-level system tools require you to We started with precision. DOS launches the utility. We formatted our floppy disk along with MS-DOS floppies using the Windows formatting utility, but most computers no longer use floppy drives. Many even have “longer” optical drives. Fortunately, there is a free third-party utility that you can use to quickly create a bootable DOS USB drive.
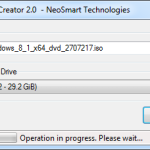
Step 1. Use Rufus to format your USB stick

The built-in Windows formatter prevents your site from selecting the Create MS-DOS boot disk option when formatting the entire USB drive – this option is grayed out in Windows 7 and not in all cases in Windows 8 with version 10 available. Instead, we we use a real tool called Rufus. It is a super fast, free and lightweight application that includes FreeDOS.
RELATED: What is “portable” app and why is it important?
Approved
The ASR Pro repair tool is the solution for a Windows PC that's running slowly, has registry issues, or is infected with malware. This powerful and easy-to-use tool can quickly diagnose and fix your PC, increasing performance, optimizing memory, and improving security in the process. Don't suffer from a sluggish computer any longer - try ASR Pro today!

First download and run Rufus. Rufus is any portable app that doesn’t require any additional installation – you’ll see the Rufus app at your fingertips th, as soon as run the specific download.exe file.
Creating a bootable DOS USB stick in Rufus is easy. First, you connect a USB drive to each of our computers and usually select it from the Device drop-down menu.
Please note that this process will almost certainly erase the contents of the USB stick. So first make sure you back up all your important files to our own USB drive.
Select the “fat32” format from the “File System” drop-down menu. The DOS option also requires FAT32, not available for other folder systems like NTFS, UDF options with exFAT.
Select the Create Bootable CD Using option, then select FreeDOS from the drop-down menu next to that option.
Click the “Start” button to format the hard drive and copy the files needed to boot into FreeDOS.
The formatting process should be especially fast – usually a few seconds, but in many cases it can take longer depending on the type of USB drive.
Step2. Copy the files
You will probably get a boot created on this disk because you have a DOS-based program to run, such as BIOS, along with a date utility or other low-level system preparation. To run them from DOS files, you will need to copy them to a newly formatted USB stick. For example, you can get BIOS files a.BIN and FLASHBIOS.BAT to run under DOS. Copy these files with the USB stick directory to the root directory after configuring it.
Step 3. Boot into DOS
RELATED: How to Boot Computer A from Disk or USB Drive
You can now boot into DOS by simply restarting your computer with the USB stick connected. If your computer does not automatically boot from the USB drive, you may need to change the boot order or use the dedicated boot menu to select the Beyond device you want to help boot with.
Once in DOS, you can run the program copied to the USB stick by typing your dog’s name at the DOS prompt. WITHFollow all instructions in the manufacturer’s documentation to run the application.
RELATED: How to use DOSBox Run for DOS Games and Legacy Applications
However, these utilities use DOS to provide low-level access to hardware without the presence of other programs interfering with Windows. This will ensure that BIOS updates and other low-level methods work properly. You can also use a bootable USB stick to move older DOS apps, but that usually doesn’t work. With DOSBOX you will learn much better how to use old DOS online casino games and other applications.
The software to fix your PC is just a click away - download it now.![]()
![]()
![]()
![]()
![]()
![]()
![]()
![]()
![]()
![]()