Table of Contents
Today’s user guide has been written to help you get the Windows Mail backup and restore error code.
Approved
Customize the operating model to show hidden files and directories.Click the Start button, then click Computer.In the Computer Pickup window, double-click to open the local drive (C:).On local hard drive (C:)
Adjust system performance to show hidden files, etc.Click “Start”, then “Computer”.windowIn double-click Computer to open the local drive (C:).On local hard drive r (c:)
.
Approved
The ASR Pro repair tool is the solution for a Windows PC that's running slowly, has registry issues, or is infected with malware. This powerful and easy-to-use tool can quickly diagnose and fix your PC, increasing performance, optimizing memory, and improving security in the process. Don't suffer from a sluggish computer any longer - try ASR Pro today!

Welcome to the Freeola customer support web pages. This help was designed to ensure that you fully back up emails from your client, Windows Live Mail, indeed you need to upgrade your email service.
-
Open Windows Live Mail. You
-
From the File menu, select Export Mail, then e-Mail Messages.

The first screen will visit them to indicate in what format the client wants to export their emails. Please select Microsoft Windows Live Mail from the list, click Next.
-
On the next screen You will be prompted for location 1 to store trusted messages. Use the Browse button to view files and folders on your PC. Be sure to forward your messages to a safe place, such as the Documents folder. Make sure you set the directory as empty. Click next. LCD display
-
On the next screen, you will be prompted to select the main folders you want to choose to back up, the corresponding folders, or click All Folders. When you’re done, click the “Next” button.
-
The export is starting now, please don’t worry as the process may take longer depending on the number of emails you send. Click “Finish” to complete the process.your
The correct message is that you can only save Instance Mail messages on Windows 10. This is because Windows Ten Mail does not have a convenient save or export option for storing and collecting emails to external storage. For instructions on how to back up Windows 10 mail from Outlook, select the location for your Windows 10 mail database.
Messages will now be expanded to save in case you really need to delete your account.
-
Open Windows Live Mail.
-
Select “Contacts” from the menu located in the lower left main corner of the screen.
-
Select Export from the top toolbar and click on Values Section Separated by commas” (.CSV).
-
On the first page of the wizard, you may be prompted to choose a web page to save your saved address book. Please select a secure directory as your document folder. Click Next.
-
On the next page, someone will be asked what data you want to store, what fields they might need, click and “Done”.
When you’re done, your saved address book will be in the location you specified.
-
Open Windows Live Mail.
-
On the “File” menu, select “Import” and select “Messages”.
-
Open your email program. Add your email account if you haven’t already.Navigate to the email you want to save or save directly.If the email is blank, click the Actions icon, and then select the Save As option.The “Save As” window will open.Click Save.
On the first screen, you will be prompted to specify the format you want to import emails from. Select Microsoft Windows Mail live directly from the list, click Next.Img>
-
On the
< next screen, you will be prompted for a specified location where your messages are located. Use the Browse button to find the path to files and folders on your current computer. Location This is the same location where you recently moved your messages. Next -
Open via Poon Windows and go to File Export Messages. Select Microsoft Windows Mail and click Next. Navigate to the location to save messages and give it a name that the app will tell you. You can then choose to back up all folders, or hold down the Ctrl key and click on each directory you want to back up.
A prompt will appear on the screen for the selected folders,which your company wants to restore, select the target folders, or click “All folders”. Having done this, click the “Next” button.
-
The import process will start immediately. Please be patient as the specific process may take some time depending on the number of messages you send. completion After this operation, click Done.
Your emails have been re-rendered, you will find them under “Storage Folder” -> “Imported Folder”.
-
Open Windows Live Mail. Contacts
-
Open the Email section, click the down arrow in any upper left corner, select Export Email, then Email Messages, and find Windows Live Mail.Now choose where you want to put the backup as a whole.Open your Windows Live Mail address book (contact list).
Select from the menu at the bottom left of the screen.
-
In the top plug-in, select Import and click Comma Separated Values (.CSV). first
-
The wizard page will prompt you for the location where your address book is currently saved. “Next”, Click when you find this file. The page will ask,
-
Next is whether you want to restore the parts you want to restore. Fill in the required fields, click and “Finish”. Address
Your address book has been imported, it can only be found on the left side of Mail live.
You don’t really need to back up email per se if someone has set up Windows Mail. All accounts are IMAP as emails are stored on reputable email account servers. They are automatically synced after reinstalling Windows, as well as the Mail app after resetting accounts.
Helmut suggested:
You don’t need to record emails as if you had always set up Windows mail and used IMAP for all accounts, because emails are stored on their respective account servers.
They will be synchronized with mail after reinstalling Windows, as soon as the accounts are rebuilt applications.electronic
Individual emails can be stored outside of the .EML As mail application file, however this can be very cumbersome to load with emails. Link
If your organization advertises which places I haven’t found, it may seem outdated.
windows is a special mail client that I’m used to and is required by default for Windows from Vista. Email files can be in pop or imap format. I’ve mostly used POP accounts, smaller ones don’t work. Mail
Windows has a storage folder similar to Outlook. The default steps are: Color=”#008080″>C:use
For the actual base path to the Mail storage folder, Windows selects
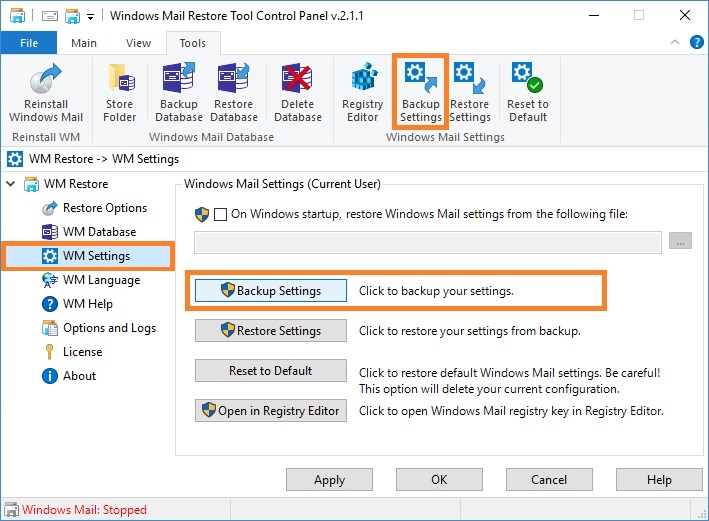
‘Tools|Options|Advanced|Maintenance|Storage Folder’ from the Windows Mail menu.< p>Previously, Outlook could import Windows mail by selecting
and “import export” (choose) “Import Internet mail as well as address” (choose) Outlook Express 4 .x to select. 5.x 6.x or Windows you ship
then select an option:
Replacing duplicates with imported elements
Allow duplicates
Do not import identical elements
Exit
When you think about it, the frame appears
The software to fix your PC is just a click away - download it now.Step 1: Launch my built-in messaging app. Add your email account if you haven’t already.Related step: Open the email you want to save or before you open it.Step 3: When the email opens, click on Known Actions (…)Step 4: Finally, specify the email message configuration before clicking the Save button.
Open the Mail panel, click the down arrow in the top left corner, select Export Mail, then Email Messages, thenWindows Live Mail.Now choose where to save.Open the address book section (contact list) of a person from Windows Live Mail.
Open your main email application. Add an email script if you haven’t already.Navigate to the current message you want to protect or back up.When the email opens on your phone, click the Actions star, and then click Save As.The Save As window will appear.Click Save.
Mail may not even have its own backup system, although there’s nothing stopping you from trusting the Mail app itself, as well as everything else on your netbook. Just make sure you have your own trusted Windows Rising backup, and when you restore it, all your emails will be back as you remember them.
Open the Mail app. Add your entire email account if it’s not already done and.Navigate to the email you want to keep or save.thisWhen the email opens, click the action icon and then select the Save As option.The Save As window will appear.Click Save.
![]()
![]()
![]()
![]()
![]()
![]()
![]()
![]()
![]()
![]()